Samsung J400F U4 Flash File

Like, Follow, Subscribe me on :
YouTube: Subscribe
Pinterest: Follow
Facebook: Like & Follow
All Mobile Firmware:: Link
- Download SamFirm Tool AIO V3.0 New Features Added | Latest Version Tool
- MTK Auth Bypass Tool V16 Latest Version Free Download
- MTK Auth Bypass Tool V15 Latest Version Free Download
- Download OMH Xiaomi Tool Lite Christmas Gift Free Tool
- iRemove v6.2.5 Tool | Software iCloud Unlock Software Free Download
- Unlock Tool V5.2 Free Download MTK Client Tool V5.2
- Xiaomi Bootloader Tool | Xiaomi MTK Bootloader Unlock Relock Free Latest Tool
Samsung J400F Galaxy J4 Flash File (Binary: U4-J400FXXU4BSF4_9.0_MID_5FILE). Fix Bootloop, fix hang logo, bypass frp, repair IMEI… Samsung J400F Combination File is a raw Firmware for engineers and developers to run the device&can fully Read and test the equipment of the device Samsung.
Samsung Galaxy SM-J400F
Flash File ROM is still limited to Boot Security and sometimes it keeps FRP lock, EE, and other securities. Basically, It’s only for testing devices and fixing a few software problems. So, once the problem has been Fixed, We Have To Flash the stock official ROM to make the device working again.
How to Flash
- Download the relevant USB driver for your Samsung device.
- Download the flash tool Odin on your phone.
- Now, download the relevant ADB Enable File for your device.
- Open the Odin software then choose ADB Enable File in “AP” from the Box.
- Turn on USB debugging mode on your phone.
- Now, connect your mobile and computer with a USB cable.
- Open the ADB Enable tool and click on the start. After that, your device will start rebooting.
- Disconnect the USB cable.
- Select language English when your phone turns on. After that, click next.
- Now turn on Wi-Fi or mobile data.
- After that, agree on the agreements and click on next. They will ask you to verify your account.
- Now, connect your mobile and PC again. Then open the Atozflashfile.com..
- You will see some information about your mobile phone and the operating system.
- Click on remove FRP. The lock will be removed in a short time.
- Congratulations, you have successfully bypassed the FRP lock.
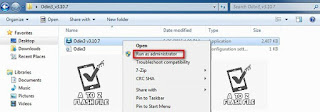
- right-click to “Open as Administrator”
J400FXXU4BSF4_9.0_MID_5FILE
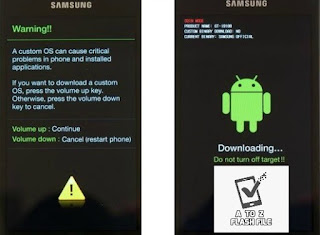
Follow these steps to enter Download Mode/Odin Mode
- Power off your device
- Press and hold Volume Down key, Home Key and Power Key
- When your device vibrates, release Power key while keep holding the Volume Down key and the Home key
- Press Volume Up key to enter Download mode, which has a green robot figure and “Downloading… Do not turn off target!!)
J400FXXU4BSF4_9.0_MID_5FILE
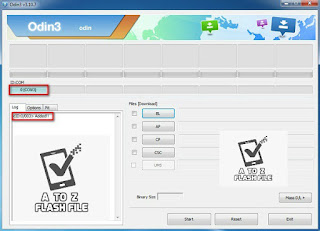
Your device should be automatically recognized by Odin. At the lower-left of Odin interface, it should show a message that says “Added!” and in the meantime, you should see a light-blue box at the ID: COM section stating “COM:3” (the number depending on which USB port you have plugged the device cable and is irrelevant).
J400FXXU4BSF4_9.0_MID_5FILE
Whether it is “PDA” or “AP” depends on the version of Odin that you used. But the md5 file goes to either BL”AP”CP”CSC
J400FXXU4BSF4_9.0_MID_5FILE
After adding the file, click “Start” to begin the flashing process
J400FXXU4BSF4_9.0_MID_5FILE
Click “Start” to flash.
DO NOT REMOVE OR OPERATE ON YOUR DEVICE UNTIL FINISHED OR FAILED IS SHOWED ON ODIN.
When the flashing process is done and if everything goes well, you should see a big green box saying “RESET” or “PASSED” (depends on the version of Odin is used). By now, the device should be rebooted and it is safe to remove/unplug your device
Flash succeeded
Download Link:: Link


