Samsung A025F Official Firmware

samsung a025f official firmware
Removing FRP on Samsung with Combination File
Many people think that they will bypass or remove the FRP lock on Samsung Galaxy just by installing the stock firmware via Odin. I remember doing an equivalent to repair the firmware reset protection on a friend’s Galaxy S7 Edge. the reality is, you can’t remove FRP lock Google account issue on Samsung mobiles with a traditional firmware flash.
Below, I’ll be describing the tactic to flash combination firmware on Samsung devices to get rid of the FRP lock.
1. Download Samsung Firmware
Since we’ll be employing a combination of specific firmware binary components, you’ll got to download the newest Samsung firmware for your Galaxy device. you’ll grab or get the firmware file for your device model from any of the sources mentioned below.
2. Create Samsung Combination File
Okay, now that you simply have downloaded the right firmware for your Samsung Galaxy phone or Tab, it’s time to make the mixture firmware to get rid of the FRP lock on your Samsung device.
- Extract the downloaded Samsung firmware Zip file. you’ll use a zipper archiver like WinRar, 7Zip, PowerArchiver, etc. for the aim .
- Open the extracted folder and you’ll find 5 firmware binaries including AP, BL, CP, CSC, and Home_CSC.
- Make sure you’ll view the .md5 extension of the files. If you see only .tar, click on the View tab on the Windows Explorer window and check the choice that says ‘File name extensions‘.
- Now, right-click on the firmware file that starts with AP in its name and choose the rename option and add a .zip extension after .md5.
- Then select the BL file and alter its extension to .zip too
- You can now extract the AP and BL zip files.
- Open the AP folder, copy the boot.img.lz4, and system.img.lz4 files and paste them during a new folder.
- Similarly, open the BL folder and move the file names sboot.img.lz4 to an equivalent new folder.
- Open the folder where you saved the boot.img,lz4, sboot.img.lz4, and system.img.lz4 files. Select all three files and zip them into one file by
- selecting the Compress to “New folder.zip” option from the Windows context menu
- Now, change the Zip extension of latest folder.zip file to .tar and rename it with the firmware name as shown below.
You have successfully created the Samsung combination file to get rid of FRP on your Galaxy device.
- Once you get into the Android Recovery menu screen, select the Wipe data/factory reset. you’ll use the quantity up/down keys to navigate and therefore the Power button to verify the choice .
- Perform a data/factory reset then select the Reboot system now option.
- When your Samsung device boots up, you’ll see the Samsung factory binary screen almost like one like shown below. Tap the mosaic icon on the top-left corner of the screen.
- Doing so will show you the app drawer screen. Navigate to Settings > Developer options and enable USB debugging. If you don’t find that
- option, here is how you’ll activate the Developer option on Samsung devices.
- Now, close up your phone or tablet device by holding the facility button.
Flash Samsung Combination File with Odin
Okay, you now have the Samsung combination file that you simply created from the stock firmware. you’ve got also enabled USB debugging on your Galaxy device to make sure that Odin can it. you’re ready to get rid of the FRP lock on your Samsung phone or Tab.
Samsung G9350 Combination File U1
Download the patched version of Odin and extract the Zip file on your desktop.
- Odin3 3.14.1 3B PatcheD (for devices released 2018)
Odin3 3.13.3 3B PatcheD (for older Samsung models) - Download and install the newest Samsung USB Driver on your Windows PC and reboot your system.
- Open the Odin folder and launch Odin3.exe as an administrator.
- It’s time else your Samsung device into the Download Mode
- Connect your device to the pc employing a compatible USB cable.
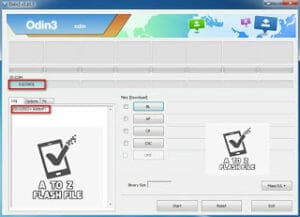
- When your phone or tablet is recognized by Odin, the ID:COM port are going to be highlighted.
- Click the choices tab in Odin and confirm that only the Auto Reboot and F. Reset Time options are enabled there.
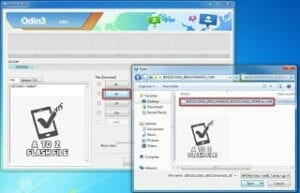
- Then click on the AP button and add the Samsung combination file you created earlier.
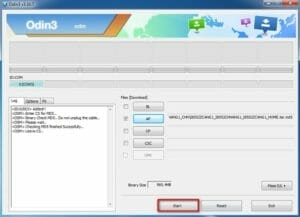
- Finally, click the beginning button to trigger the installation.
- Wait until the mixture firmware installation finishes and you’re greeted by the PASS!! message in Odin. Your Samsung Galaxy device will reboot automatically.
- Just wait until your device boots up and that’s it. you’ve got successfully removed FRP lock on your Samsung Galaxy smartphone.
Please get the approval to use factory binary (PIT)
Sometimes, Samsung’s security feature might block the installation of custom firmware and throw the subsequent error on the Download Mode screen of your Samsung Galaxy device.
To fix this, you’ll flash Hell (Partition Information Table) file for your device along side the Samsung combination enter Odin. If you don’t skills to urge the right PIT file, read my tutorial describing the steps to extract Samsung PIT from firmware.
Please confine mind that if you put in Hell file, you’ll need to check the Re-partition option under the choices tab in Odin also . Moreover, you’ll got to add Hell enter Odin by clicking Hell tab in Odin. If the Samsung combination file doesn’t assist you to get rid of the FRP lock, you ought to also try the NAND Erase method using Odin.
Samsung G9350 Combination File U1
3. Reset Samsung Device and Enable USB Debugging
Before you proceed to put in the mixture file, you would like to perform a knowledge factory reset. Since you can’t do this via the device settings of your Samsung Galaxy phone or Tab, you would like to try to to that via the Recovery Mode. the tactic to access the Recovery mode on Samsung devices dif5fers from model to model. you’ll ask my detailed tutorial on booting into the Samsung Recovery Mode.
On this page, you’ll find the official link to download Samsung Stock Firmware ROM (flash file) on your Computer. Firmware comes during a zip package, which contains Flash File, Flash Tool, USB Driver and How-to Flash Manual.
he Flash File will assist you to Upgrade, Downgrade or re-install the Stock Firmware (OS) on your Mobile Device. The Flash File (ROM) also helps you to repair the Mobile device, if it’s facing any Software Issue, Bootloop Issue, IMEI Issue or Dead Issue.
Flash Stock ROM to unbrick your Samsung
Flash Stock ROM to unravel the boot loop issue
Update and Downgrade
Unroot or Fix Bugs on the phone
To solve the lag or stutter
By flashing Stock ROM, you’ll fix software issues.
Revert back to stock to urge your warranty.
Before getting to install stock ROM you would like to require all of your messages, photos, and apps from your current smartphone. this needs a backup that you simply then restore on your device after flashing or updating the firmware.
Most smartphones automatically make a backup within the background, just in case something happens. But to form sure you’re taking everything to your new device, you would like a full backup.
How To Flash
Follow these steps to enter Download Mode/Odin Mode
Power off your device
Press and hold Volume Down key, tonic key and Power Key
When your device vibrates, release Power key while keep holding the quantity Down key and residential key
Step 2: After extracting the package, you’ll be ready to get the Firmware File, Flash Tool, Driver and How-to Flash Guide

Samsung A025F Official Firmware
Warning before getting into download mode
In the initiative cut your phone by holding the facility key for a cpuple of seconds. Then press and hold together Volume Down + Bixby + Power button a few seconds.
After that, you ought to see a menu with two options. Finally, enter Download Mode by pressing Volume Up

Connect your device to PC.
Your device should be automatically recognized by Odin. At the lower-left of the Odin interface, it should show a message that says “Included! “Added!” and within the meantime, you ought to see a light-blue box at the ID: COM section stating “COM:3” (the number depend upon which USB port you’ve got plugged the device cable and is irrelevant).
Step 3: Install the provided USB Driver on your Computer, and if just in case USB Driver is already installed, SKIP this step).

Click “PDA” or “AP” to feature the tar.md5 file that you “Start”.
Whether it’s “AP” depends on the version of Odin that you simply used. But the md5 file goes to either “AP”.

Add *.md5 to Odin.
adding the file, click “Start” the flashing process.

Click “Start” to flash
DO NOT REMOVE OR operate YOUR DEVICE UNTIL FINISHED OR Pass PASS PAsssaa IS SHOWED ON ODIN.

Ongoing flashing process. don’t remove your device.
When the flashing process is completed, you ought to see an enormous green box saying “RESET” or “PASSED” (depends on the version of Odin is used). By now, the device should be rebooted and it’s safe to remove/unplug your device.
Step 4: Follow the How-to Flash Manual to Flash the Firmware on your Samsung

Flash succeeded.
Flash Tool: If you would like to download the newest version of Odin Downloader Tool,
Take a Backup: If you’re getting to flash the above Firmware on your Samsung device, then take a backup of everything as because your personal data are going to be deleted after flashing the stock firmware.
The firmware shared on this page is officially released by the corporate and helps you to recovery your device if you ever got bootloop, programming error , update error, hanging and dead issue.
Samsung A025F Official Firmware
| Samsung A025F Official Firmware |
| A025FXXU1ATK5 10 4File |
| Download Link:: Link |


