Samsung A202K U2 Android 9 Root File

How to Flash
- You will then be able to get Odin V3.1.0 and Samsung ROOT A260G U1 8.1.0 Frp Off Oem Off FileFile after extracting the zip file.
- Power off your Samsung device.
- Then, press and hold Power Key, Home Key, and Volume Down Key at the same time.
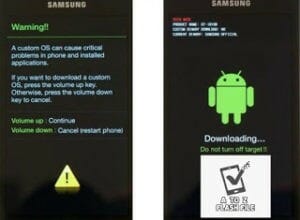
- When prompted as shown, press the Volume Up key to continue the process and you will enter Download Mode.
- Step 2 Perform Odin3 and Connect Samsung Device to PC.
- Launch Odin3, and connect your Samsung via USB cable to PC.
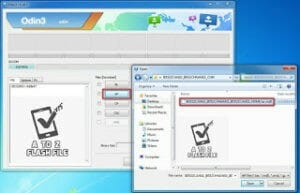
- Once you have connected your handset to the computer, Odin3 will automatically recognize the device and prompt “Added” in the lower-left panel.
- Now, click on the “AP/PDA” button and select the file extracted in advance.
- After that, click on the “Start” button to begin the rooting process.
- It will take a few seconds to finish rooting, and when it finished, the green “PASS” will inform you that the rooting process is finished.
- When your Samsung phone is on anew, there will be a Magisk Apps app shown on the screen which means you’ve succeeded in rooting.
- Besides, you can check out the root status by using
- What if it fails to get root on your Samsung phone, check out the solutions below.
- 1. Restart your PC and install Samsung USB Driver, and try to reconnect.
- That’s all about getting rooted in Samsung phones with Odin3.
How To Root
- right-click to “Open as Administrator”

Follow these steps to enter Download Mode/Odin Mode
- Power off your device
- Press and hold Volume Down key, Home Key and Power Key
- When your device vibrates, release Power key while keep holding the Volume Down key and the Home key
- Press Volume Up key to enter Download mode, which has a green robot figure and “Downloading… Do not turn off target!!)
Your device should be automatically recognized by Odin. At the lower-left of Odin interface, it should show a message that says “Added!” and in the meantime, you should see a light-blue box at the ID: COM section stating “COM:3” (the number depending on which USB port you have plugged the device cable and is irrelevant).

Whether it is “Root” or “AP” depends on the version of Odin that you used.
After adding the file, click “Start” to begin the flashing process
Click “Start” to flash.
DO NOT REMOVE OR OPERATE ON YOUR DEVICE UNTIL FINISHED OR FAILED IS SHOWED ON ODIN.
When the flashing process is done and if everything goes well, you should see a big green box saying “RESET” or “PASSED” (depends on the version of Odin is used). By now, the device should be rebooted and it is safe to remove/unplug your device
Flash succeeded